These two weeks I've worked on various parts of the game and the editor. Generally speaking, I'm closing in on having some idea what it's going to look and feel like and I've been taking detailed notes along the way. But more on that some other time.
Projectors
Also known as those dark things under the characters.


These things are actually rather complicated, if one would care enough to get into detail. And, believe me, for this - you do have to care a lot. Let's quickly break down the necessary steps:
- generating camera matrices and culling data (just some typical math stuff)
- culling meshes with camera frustum (finding out what the projector "sees")
- clipping meshes with camera frustum (cutting away precisely the bits that are outside our projector)
- generating additional texture mapping data (more typical math stuff)
- putting all meshes together and generating index data (math, not even once)
All these steps give us a brand new mesh, which must be regenerated on every frame, which is why these things are usually limited to projecting on the big, outliney stuff, not the extra detail, and definitely not anything involving vertex animation.
And of course, there's some additional stuff to be done, like allocating a renderer processing step that does all those things and renders the result in a specific way.
Decals
Also known as "static projectors" or "dirt, holes, stains, street art and anything in between".
My first test case for these things was bullet holes. But, be not afraid, there will be blood.

The image above could use a title "do you miss me?", referring to the character standing in the middle of a lot of bullet holes, but to nail it properly, I should be doing it the way it was done in Ali G Indahouse, in the beginning of the movie. Damn these tech preview images for being useless for jokes. :(
But technically, odd as it may seem, the hard part is to figure out how to manage lots of them cycling over and over again, deleting the old ones to avoid eating up all the memory, letting the browsers do that instead. Figuring this out involved walking around the room for a rather long time, which is my usual way of thinking, so I expect to find on me a pair of legs twice as thick after this project. It's not all bad to be walking in circles though, since, if and when some idea decides to appear, I'm not too far from trying it out.
The final algorithm that I could come up was extremely simple:
- append all the new decals during the frame, recording their contribution to vertex/index buffers in a decal buffer (two integers per decal)
- before uploading, count the number of oldest decals to remove and simply remove those parts from beginning of the [vertex;index;decal] buffers
- adjust the indices according to the number of previously removed vertices
Those of you who've dealt with dynamic arrays, should notice that I'm doing one of the most evil operations here - removing elements from the beginning. But as long as they're plain data and I can remove all I need to remove in one operation, and I'm not reallocating memory, it doesn't actually hurt.
Also, the bullet system is mostly implemented as well (needs filtering and raycasts). It supports penetration distance testing for shooting through corners and those very same impact decals from the image above.
Editor
Also known as the way to put game levels together without typing & testing all day long.


I've been hunting for workflow lately. After finishing My Flag, the current state of the editor seemed rather depressive. So after contemplating possible makeover scenarios, I realized that I had no workflow in mind.
This was easily fixed by fishing around for some Hammer (Source - HL2, CS, L4D, etc. - map editor) / Radiant (Quake / CoD map editor) tutorials that would explain how other people do things. I was increasingly doubtful about the possible ways to decorate a level, and then I found out that AAA studios still do a lot of the stuff by hand. First they make the rough structure using basic blocks (this I knew before, but not in detail) and then they add extra detail with subdivision surfaces and texture blending (this was a bit of a "wow").
I was looking at some funny decals in CoD: Modern Warfare, thinking that there was no way this kind of art could be done even semi-automatically, they must be using some special tools. Turns out, I was right about the first half - it wasn't anything special, just the ability to edit the so-called "terrain patches" and a team of level designers (I'm guessing those are the people under "Design and Scripting"). Problem now is, even though I'm completely clear on how they made those decals, I'm now puzzled over their ability to produce those amazing, natural-looking terrains with those basic terrain patches.
The thing is, a terrain patch is simply a subdivided rectangle. Well, not "simply" - the texture tools contain a healthy bit of "automagic" generators. You just have to choose the scale and press on the button that you think will generate the right layout for you. But the simplicity involved in that decision is amazing. For example, all your vertices are at all times addressable using one or two indices (it's always a 2D grid). This makes it extremely easy to insert edge strips (end-to-end cuts with vertices) anywhere, just like in Excel. Texture coordinate generation that follows the "flow" of this quad list is simple as well.
Getting back to my editor, this is what I've upgraded so far:
1. Texture auto-fitting. Setting how many times to repeat a texture on a surface in one or both axes and letting the editor take care of the rest. Useful for texturing walls. This is the first change I decided to implement because it's the easiest.

And here's a picture of a wall that looks a bit more real:

2. Object groups. Here I was imagining how I'd construct buildings - they could be turned (solved using per-group transforms), would need cutting out window/door areas (not solved yet, but the idea is to use group-local subtractive blocks). Also present would be specially modelled interior objects that could be sketched out geometrically in the editor, to be fully replaced later (solved by group block export to .obj).


3. No guest feels truly welcome without house preparation and no new feature works best without refactoring. So I started fixing the code. Split the huge file into several, extracted editor actions from the huge "main frame" class. Easily summed up in a few words but took many hours to accomplish.
4. Map layout-stage workflow implementation. I was watching this video and suddenly thought - hey, this is what I want. So I started working on block transformations that would allow me to easily make such modifications to the level, except - without two views. I don't like the concept of multiple views much because it cannot be as easily extended to off-axis editing. So, given such a constraint, I first reimplemented block moving - with the ability to lock onto axes and planes, like in Blender.

Then I implemented "extending", which is a really cool feature. It allows to stretch the selected blocks according to the selected point, automatically limiting scaling and movement axes.

Those points also automatically appear or disappear, based on the camera angle - if the point is more likely to damage the transformation (allows movement in direction towards or away from camera), it will be hidden and other points (that don't have destructive effects) can be reached easier.
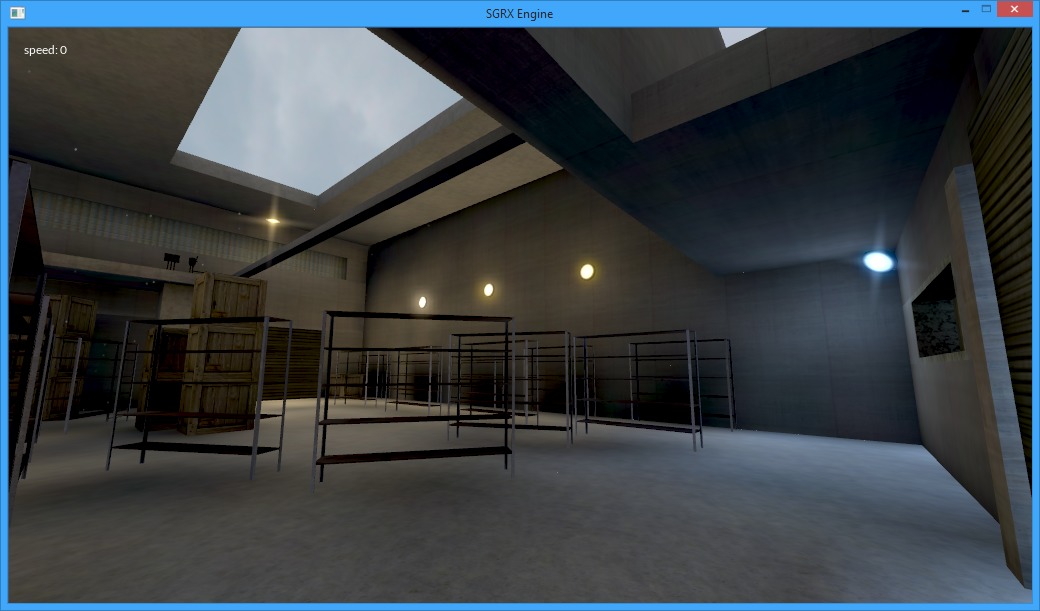
This change has allowed me to quickly sketch a room layout like this in 1-2 minutes:

Looking towards the future, I have but one major thing left to do in the editor now - vertex editing has to be reimplemented for convenience. I'm already working on it, not much is left to be done.
Game UI

Just something I designed a few days ago. The font is not the right one but fits rather well just the same.
The weapon "slices" of the inventory were a concern technically. I considered various ways to render those. Including a special shader:

With some very simple functions, I can draw some slices easily. The only problem - it would be designed specifically for one kind of inventory and it would not scale. So in the end I guess I could just integrate nanovg path tessellation code or something. It was a nice proof of concept, though.
By the way, that thing in the picture - RenderMonkey. I still use it due to its simplicity, even though it is discontinued by AMD. Great for prototyping, in my opinion. Could use a way to support other editors, though.
Another concern were those button icons that I needed to put next to fonts, without knowing their resolution. For those, I think I could use "fake fonts" - generating these icons on the CPU and using them as if they were just different fonts.
Conclusion & ending notes
Can't wait to design a graphics-demo style level with the new tools, can't wait to have full game UI in the game. Generally just excited about the opportunities right around the corner. Still got some work left to get there. Trying to get over imposter syndrome that comes from using other people's code. Shouldn't be that big of a deal since back in the day I have done just about everything myself. Got less things left to prove with every minute.
If you think I can keep up the development, and if you're interested in what's going to be made here, please visit the Steam Greenlight page and vote for the game. It would mean a lot to me.
Search
Latest images